Tuesday, October 29, 2013

SOLAR CHARGE CONTROLLERS regulate the amount of charging and discharging of the battery.
They prevent and protect the battery from over charging and/or excessive discharge.
Our controllers are built with best materials which results in outstanding performance.
The life span of our solar charge controllers is also very long.
These utilize latest technology ensuring very less self-consumption power.


FEATURES OF ZERO DROP SOLAR CHARGER FOR HF SINE WAVE INVERTER

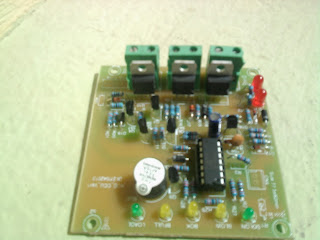
ZERO DROP SOALR CHARGER
Zero Drop solar charger with maximum current Up to 40 Amps.  
Automatic and manual inbuilt mains charger disable and enable.

PWM Charging algorithm with CC and CV
Auto Temperature Compensated charging voltage
low Self consumption
Safe for Continuously connected battery
Common-Ground for Solar Panel, Battery and Load
LED Indications for charging and battery status
 
efficiency:approx.97%
Character display indicating solar charger ON, Charger OFF
Compact and rugged enclosure

Protections:
Over load protection
Battery reverse protection
Load short circuit protection
Battery Overcharge / Deep Discharge protection

Indications:
solar on/off
Charging on/ off
Battery Low cut off
Battery High cut off
battery voltage,current, voltage,current.
Load ON, Over load
mains on and mains off.

This technology cost with BOM and schematics, software,Gerber files.
contact +91-9581457196.


Tuesday, September 24, 2013

zero drop solar charge controller


Zero drop solar charge controller technology transfer 


we had technology per solar charger with PWM and drop technology.

LCD version also available in models one with display the title and solar presence and battery voltage and state of charge.

other version was  with energy meter. it will show the voltage and current.
and watts. how mauch charge from soalr to battery in KWH.
with auto mains cut off. 

                     we provide customized solutions for electronic application.

Night mode function 

battery full cut off

battery reverse protection.

 battery low cut off.

 solar reverse protection.

 back panel discharge protection. 
LCD version

LED version.

mains cut off  version for adjusting inverter

12/24/48/96 models  available. 10 to 40 amps  load.


Tuesday, September 17, 2013

SERVO MOTOR CONTROL USING ATMEGA16

servo control
SERVO MOTOR CONTROL USING ATMEGA16
download link for c file:
SERVO MOTOR CONTROL
download link for Proteus VSM:
ServoMotorVSM

 /*****************************************************
Project : SERVO MOTOR
Version : v1
Date    : 9/17/2013
Author  : SIVA JOGI NAIDU
Company : 
Comments: 
Chip type               : ATmega16
Program type            : Application
AVR Core Clock frequency: 16.000000 MHz
Memory model            : Small
External RAM size       : 0
Data Stack size         : 256
*****************************************************/
#include
#include

// Declare your global variables here
void main(void)
{
// Declare your local variables here

// Input/Output Ports initialization
// Port A initialization
// Func7=In Func6=In Func5=In Func4=In Func3=In Func2=In Func1=In Func0=In 
// State7=T State6=T State5=T State4=T State3=T State2=T State1=T State0=T 
PORTA=0x00;
DDRA=0x00;

// Port B initialization
// Func7=In Func6=In Func5=In Func4=In Func3=In Func2=In Func1=In Func0=In 
// State7=T State6=T State5=T State4=T State3=T State2=T State1=T State0=T 
PORTB=0x00;
DDRB=0x00;

// Port C initialization
// Func7=In Func6=In Func5=In Func4=In Func3=In Func2=In Func1=In Func0=In 
// State7=T State6=T State5=T State4=T State3=T State2=T State1=T State0=T 
PORTC=0x00;
DDRC=0x00;

// Port D initialization
// Func7=In Func6=In Func5=Out Func4=In Func3=In Func2=In Func1=In Func0=In 
// State7=T State6=T State5=0 State4=T State3=T State2=T State1=T State0=T 
PORTD=0x00;
DDRD=0x20;

// Timer/Counter 0 initialization
// Clock source: System Clock
// Clock value: Timer 0 Stopped
// Mode: Normal top=0xFF
// OC0 output: Disconnected
TCCR0=0x00;
TCNT0=0x00;
OCR0=0x00;

// Timer/Counter 1 initialization
// Clock source: System Clock
// Clock value: 62.500 kHz
// Mode: Fast PWM top=ICR1
// OC1A output: Non-Inv.
// OC1B output: Discon.
// Noise Canceler: Off
// Input Capture on Falling Edge
// Timer1 Overflow Interrupt: Off
// Input Capture Interrupt: Off
// Compare A Match Interrupt: Off
// Compare B Match Interrupt: Off
TCCR1A=0x82;
TCCR1B=0x1C;
TCNT1H=0x00;
TCNT1L=0x00;
ICR1H=0x13;
ICR1L=0x87;
OCR1AH=0x00;
OCR1AL=0x00;
OCR1BH=0x00;
OCR1BL=0x00;

// Timer/Counter 2 initialization
// Clock source: System Clock
// Clock value: Timer2 Stopped
// Mode: Normal top=0xFF
// OC2 output: Disconnected
ASSR=0x00;
TCCR2=0x00;
TCNT2=0x00;
OCR2=0x00;

// External Interrupt(s) initialization
// INT0: Off
// INT1: Off
// INT2: Off
MCUCR=0x00;
MCUCSR=0x00;

// Timer(s)/Counter(s) Interrupt(s) initialization
TIMSK=0x00;

// USART initialization
// USART disabled
UCSRB=0x00;

// Analog Comparator initialization
// Analog Comparator: Off
// Analog Comparator Input Capture by Timer/Counter 1: Off
ACSR=0x80;
SFIOR=0x00;

// ADC initialization
// ADC disabled
ADCSRA=0x00;

// SPI initialization
// SPI disabled
SPCR=0x00;

// TWI initialization
// TWI disabled
TWCR=0x00;

while (1)
      { 
      
        OCR1A=20; //97; //0 degree
delay_ms(1000);
        
        OCR1A=45; //97; //0 degree
delay_ms(1000);

OCR1A=67; //316; //90 degree
delay_ms(1000);

OCR1A=89; //425; //135 degree
delay_ms(1000);
        
        OCR1A=111; //535; //180 degree
delay_ms(1000);
        
OCR1A=150; //535; //180 degree
delay_ms(1000);    
        
        OCR1A=111; //535; //180 degree
delay_ms(1000);   
        
        OCR1A=89; //425; //135 degree
delay_ms(1000);   
        
        OCR1A=67; //316; //90 degree
delay_ms(1000);   
        
        OCR1A=45; //97; //0 degree
delay_ms(1000);


      }

}


Friday, September 6, 2013

Popular Posts